
When I first tried colour pencils I didn’t have much luck with the medium and never imagined then that it would be the medium I use 90% of the time. When I try a new medium I go all out – maybe not the best idea but I can never just use a few colours. I like to have the whole set :). I guess because the set up and initial material cost is expensive it made me persevere. I had 120 pencils and all the accessories which was probably at least a couple of hundred pounds so was determined to learn.
Had I made a mistake?
My very first colour pencil drawing was of my own dog Maisey and it was TERRIBLE. I actually never finished it. I threw it in the bin and started something else. I couldn’t get the colours that I wanted, layering was so hard and I just felt so frustrated. Back then I worked in graphite pencil and oil paints. With paints you mix the colours until you get it right. Its so forgiving. If you do a mistake, wait for it to dry and paint over it. Anything can be fixed – maybe except a big hole in your canvas :).
Keep at it!
I then thought no.. other artists create beautiful work in colour pencil it has to be me just getting to grips with this challenging and time consuming medium. But also I learnt the hard way, that paper choice plays a massive factor.
You want something will a little tooth. Not cold pressed paper as that is to much texture. Something like Fabriano, Arches or my choice Strathmore.

This drawing of Marvin I completed a couple of years ago is one of my favourites. I had a beautiful reference photograph to work from so I could see all those lovely details, shapes and values which is so important especially when drawing curly fur.
Every curl and wave changes the direction of the fur. It creates more shadows and highlights. By capturing this detail and paying close attention to that fur and curl direction is what will create you the realistic portrait you’re going for.
With curly fur, the light source although is in a certain direction, bounces around more so than on a smoother coated animal. There may be a curl a few inches to the right that is longer, more of a obscure shape that catches the light more so. Make sure to include all these subtle details.
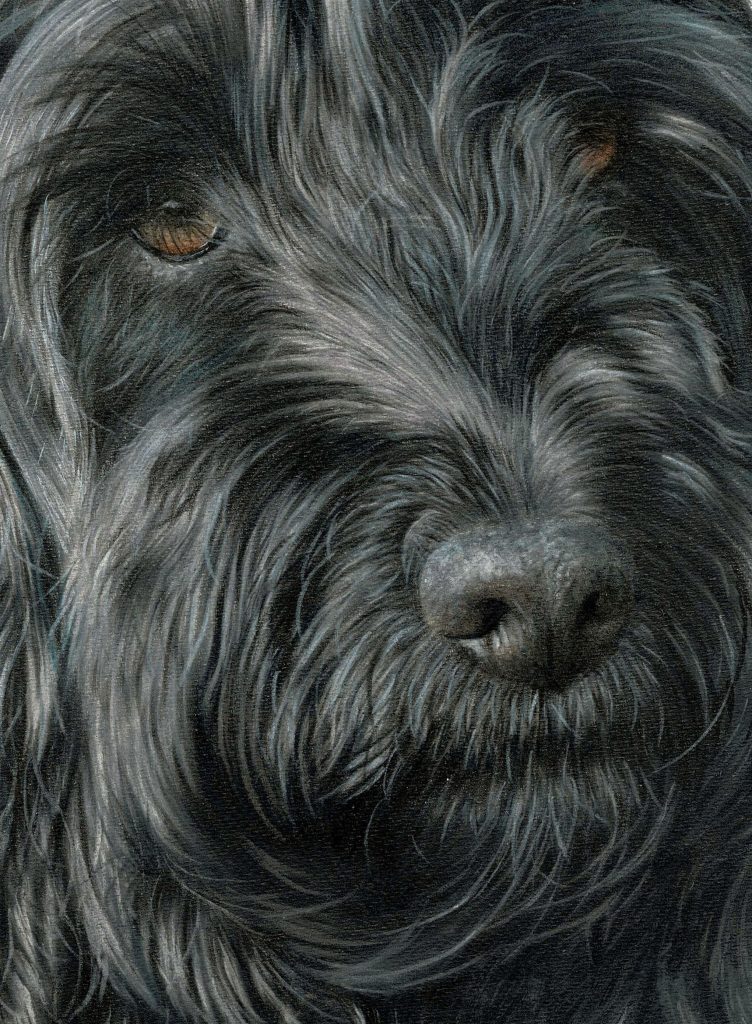
This close up shows just how the fur overlaps each other. Also, paying attention to any individual hairs because its those subtle details that will make all the difference.
In the reference photograph, Marvin’s eyes were covered by quite a lot of fur. Especially the right one. So I still indicated that the fur is there but lightened the pressure of the pencil strokes to allow more of the eye to show through. There is a hint of the eye there but ensuring you still capture the nice waves and curls around the eyes that give the lovely Cockerpoo their features.
Layers..
As with all my hints and tip posts I bang on about layers. Its important if you want the realism and detail in your work. Adding layers and understanding what pencil brands overlap best and work well with each other is only something you can really understand by practising. Learning by your mistakes as I did.. Many times! This post on how to tackle curly fur in colour pencils is a huge topic to write in a blog. The best way will be to watch some videos and just practice. Learn how the paper takes the pencil, how to blend and how to learn from any mistakes you might make.
Tip..
Colour pencil is a challenging medium.. Its not like pastels or paints where you can easily add light colour on top of dark. So you always have to bear this in mind. Its best to work from light to dark to avoid creating a muddy area trying to add lighter layers onto dark.
Watch a few of my Spaniel colour pencil videos on my YouTube channel. That will show you the curly effect and how I break each curl into its own section. Spaniel ears can be very challenging .. So break it down curl by curl if you have to.
A4 (8.3″ x 11.7″) Colour pencil drawing
Pencils..
I have 4 sets that I wouldn’t want to be without..
– Faber Castell Polychromos
– Caran D’ache Luminance
– Derwent Drawing
– Derwent Pro Colour
(I only use the light fast colours from these sets. I believe there are 2 in the Polychromos that I pulled out and probably half of the Pro Colour. But I buy all my pencils indivudually so only buy the colours that are lightfast. Then you’re not wasting your money on a full set of pencils that you cant use.)
YouTube
I have many videos over at my YouTube channel. Some full time lapse ones and others that are slower and in real time. Many different breeds with a variety of fur types so requiring slightly different techinques.
https://youtube.com/channel/UCQYmtS5InmmXuMBAW_veWnQ
– – – – – – – – – – – – – – – – – – – – – – – – – – – – – – – – – – – – – – – – – – – – – – – – – – – – – – –